

CBS Interactive
Shoving all your home theater equipment into a single, closed cabinet makes sense when you want to keep your living room tidy. There’s just one problem: overheating.
When you have things like a router, gaming console, cable box, and DVD player all mingling in one cabinet, things can get steamy. So much so, in fact, that a lack of air circulation can eventually fry your equipment. (Ring of death, anyone?)
The most obvious solution here is to remove the door from your media cabinet, but if you’re bent on keeping the appearance of your living room clean, the next best thing is to install a cooling fan.
Follow the step-by-step guide and video to install a quiet, temperature-controlled fan that keeps your cabinet cool and your gadgets happy.
Now playing:
Watch this:
How to install a cooling fan
5:37
Materials
- A cooling fan. I recommend a single or dual thermal-controlled fan, depending on the side of your cabinet.
Tools
- Speed square measuring and leveling tool
- Masking tape
- Drill and 1/2-inch drill bit
- Screwdriver
- Jigsaw
- Measuring tape
Method
Step 1: Determine and mark where the fan will be placed Placement of the fan will vary depending on your needs. For example, if most of your media equipment is located on the second shelf of your cabinet, you’ll want the fan to be placed parallel to that shelf.
Once you decide where you’d like the fan to be installed, mark the center point with a pen. Using the masking tape, create an approximate outline of the fan. Then, center the fan unit over the marked center point and masking tape. Using your speed square (or leveling tool), level the fan, and finally, trace the outline of the fan over the masking tape.
The purpose of using masking tape is to prevent the cabinet from chipping. It is not entirely necessary, but I do recommend it as a precaution, especially for those whose cabinets have a melamine finish.
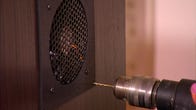
Step 2: Cut out a hole for your cooling fan It’s time to bring out the power tools. First, grab your drill and insert a 1/2-inch drill bit. Drill two holes in diagonal corners of the square you traced. This will make the process of sawing the hole a lot easier.
Prepare your electrical saw. Carefully saw on (not below!) the traced lines, using the drilled holes as starting points. Remove the cutout and check to see that the fan fits.
At this point, you should clean your cabinet and remove any saw dust.
Step 3: Assemble fan and install This process may vary depending on the cooling fan you purchased, so consult the product manual first. If you’re using a Coolerguys cooling fan, attach the fan to the grille and the mounting plate, making sure that the fan is facing the right direction. Then, insert the whole unit into the hole in your cabinet.
Using your drill and a 1/16 twist drill bit, drill four shallow holes in the corners of the mounting plate. This will make it easier to insert the screws into your cabinet. Finally, with your screwdriver, insert the screws into the drilled holes to mount the fan to your cabinet. Consult the product manual for the final steps on powering up your fan.