

Now playing:
Watch this:
How to use Tasker on Android
4:13
I don’t know about you, but one of the main issues I have with fancy-pants smart phones is the multitude of options and settings I’m forced to wade through to get my handset to behave exactly how I want it to.
It seems that every activity I indulge in requires additional steps. Watching YouTube videos or streaming music demands that I switch on my Wi-Fi. Preventing my phone from ringing during tense meetings means manually turning off the ringer. Getting an undisturbed night’s sleep is impossible unless I remember to disable email notifications before climbing the wooden hill to Bedfordshire.
Smart phones are meant to be smart, aren’t they? The clue is in the name, after all. Thankfully, there’s a solution to all this annoying hand-holding. Tasker is an Android application that promises full automation of your phone’s functionality. Having used the app solidly for a few weeks, I can report it does exactly that.
To prove its prowess, I’ve compiled this handy guide, which outlines a few of Tasker’s possible uses. It’s by no means an exhaustive tutorial — you really won’t believe how powerful Tasker is until you’ve got the hang of it — but it should give you a taster of why this exceptional download should be on your Android phone.
As usual, I’ve used the CNET UK Phone of the Year 2011 — the peerless Samsung Galaxy S2 — as my test subject for this guide. However, Tasker works just as well with any other Android phone running version 1.6 of the OS, or above.
1. Silencing your phone by placing it face down
Anyone who has used an HTC Android device will know that one of the coolest features of the custom user interface is the ability to silence your phone’s ringer, simply by flipping it face-down on a flat surface. If you’ve suffered excruciating embarrassment from your Crazy Frog ringtone sounding off during a business meeting, you’ll appreciate this.
With Tasker, any Android device can have this function. Start up the app and you’ll be presented with the Profiles screen. It’s here that all of your Tasker profiles appear, but it will obviously be blank at this juncture as you haven’t created one yet. Tap the ‘+’ icon to bring up the profile creation menu and give it a name — something like ‘Ringer silent’ will do.
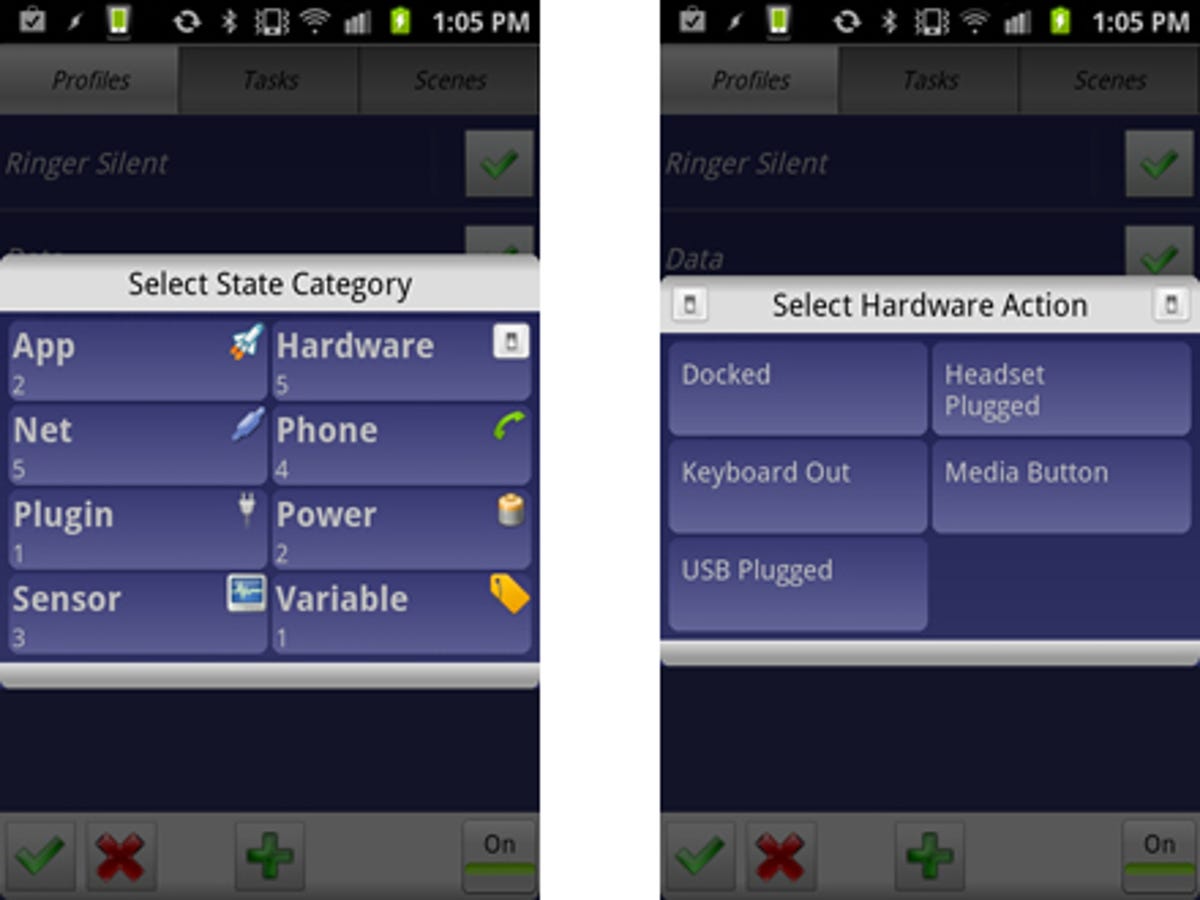

Next, you’ll have to select the context for the profile. This is basically the trigger that will cause the profile to become active. Select ‘Event’ and then ‘Sensor’. We want the phone’s ringer to go silent when the phone is placed face down, so select ‘Orientation’ and then ‘Face down’ from the next menu.
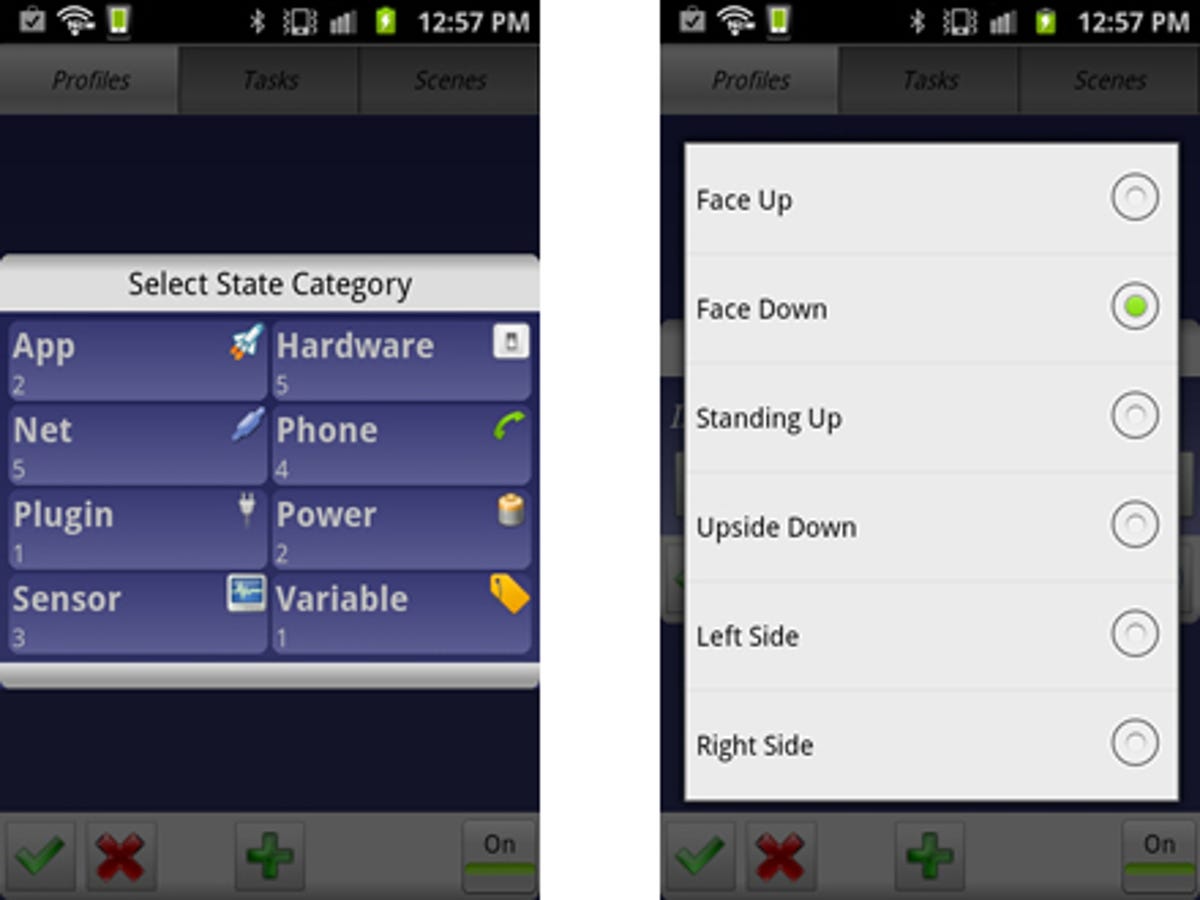

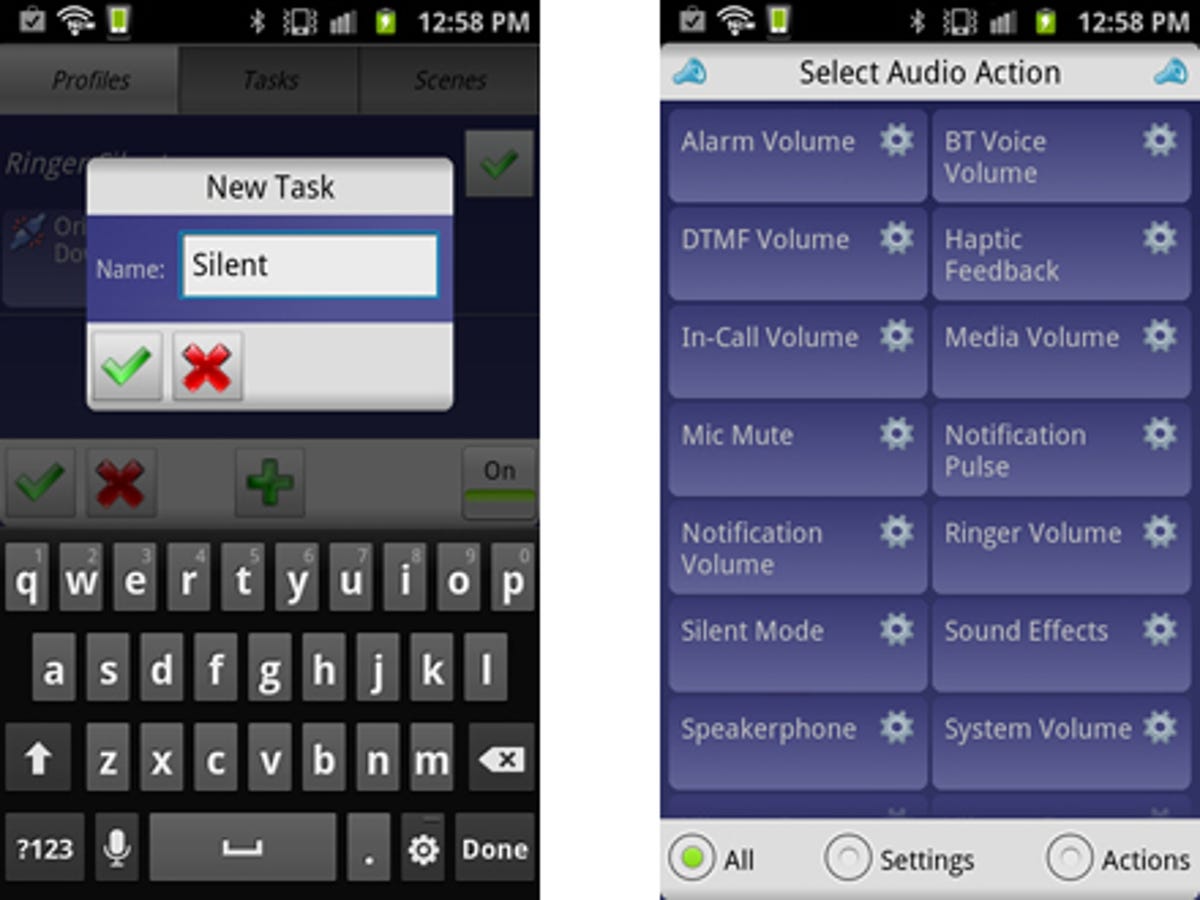
We’ve given the profile a context, but now we need to assign a task that will be executed when the context is met. Select ‘Audio’ and then ‘Silent Mode’. Toggle the setting to ‘On’ or ‘Vibrate’, and you’re golden. The next time when your handset rings when it shouldn’t, you can just flip it over and spare your blushes.

2. Automatically disabling email alerts when asleep
From the profile screen, create a new task. You can call it whatever you want, but something like ‘Mobile Data’ or ‘Data’ is probably best — that way you can see which profile does what when the screen is packed with entries.
The context you need here is time-based, as you’re looking to disable your data sync during your slumbering hours so you’re not disturbed by Facebook updates or pesky emails. In this example, I’ve told Tasker that the active hours need to be between 8am and 12am (I sleep a lot).
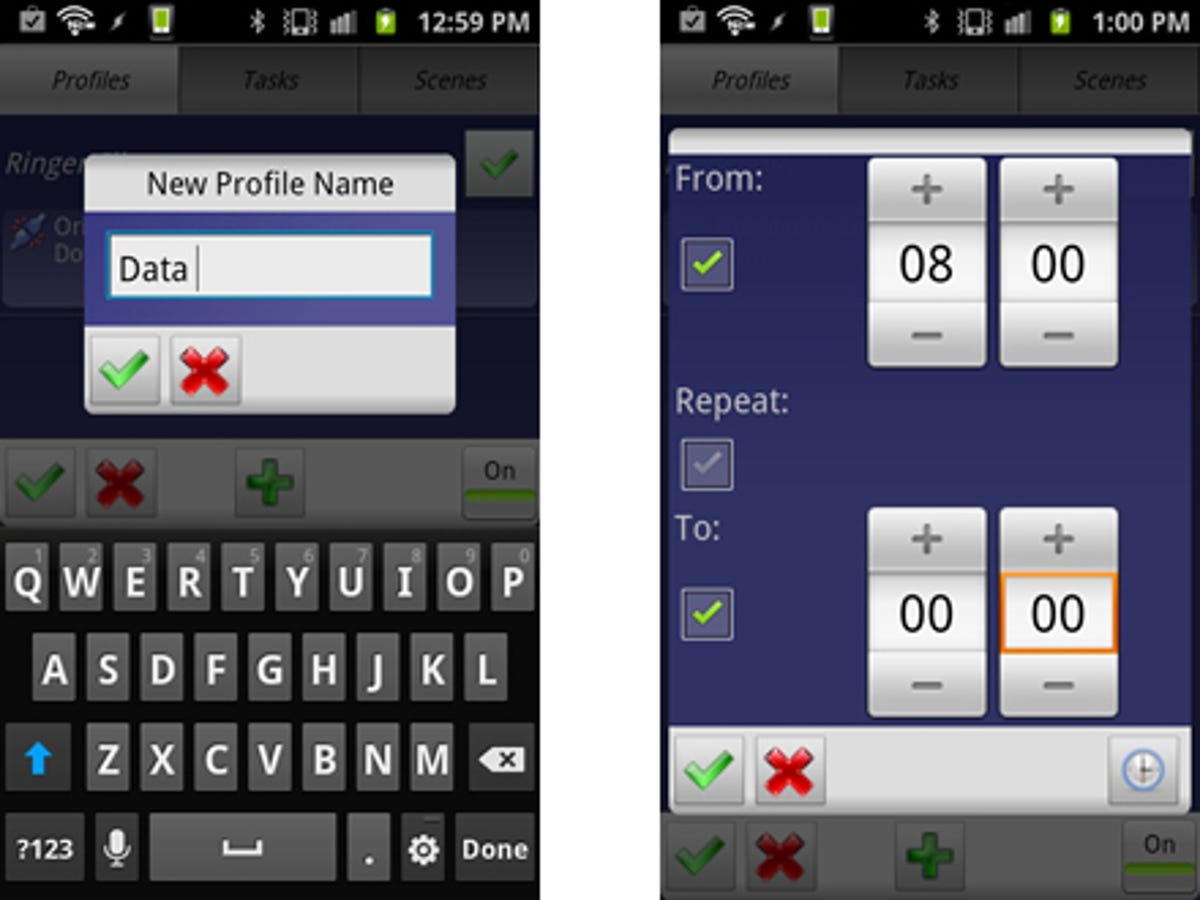

Upon accepting this, you’ll be presented with the task creation menu once again, which will show the ‘Silent’ task you created in the previous step. Select ‘New Task’, and name it something like ‘Sync’.
From the task menu, tap the ‘Net’ action icon. You’ll be presented with a list of options that apply to your phone’s wireless functionality. The one you’re looking for is ‘Auto-Sync’. Tap it, and you’ll be shown another list of options. Set Auto-Sync to ‘On’ and click accept.
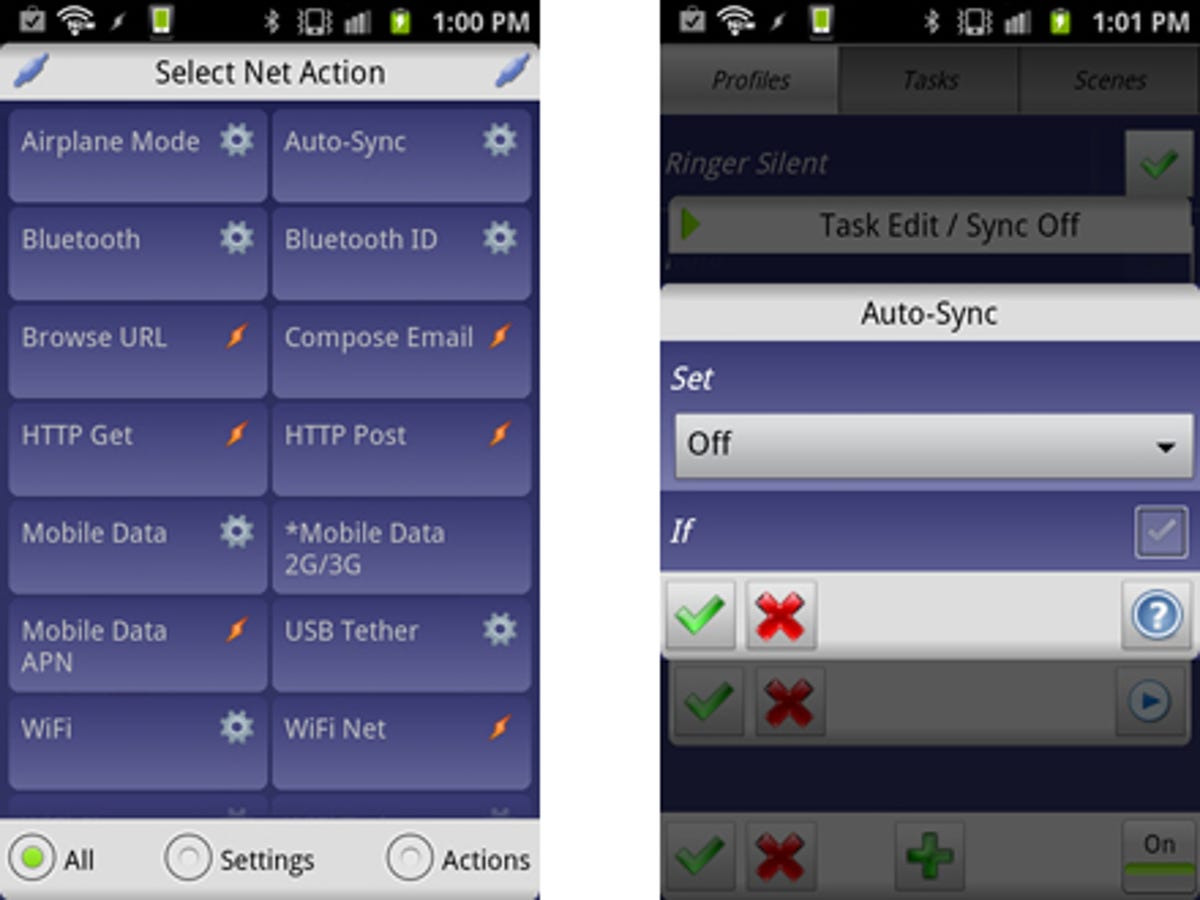

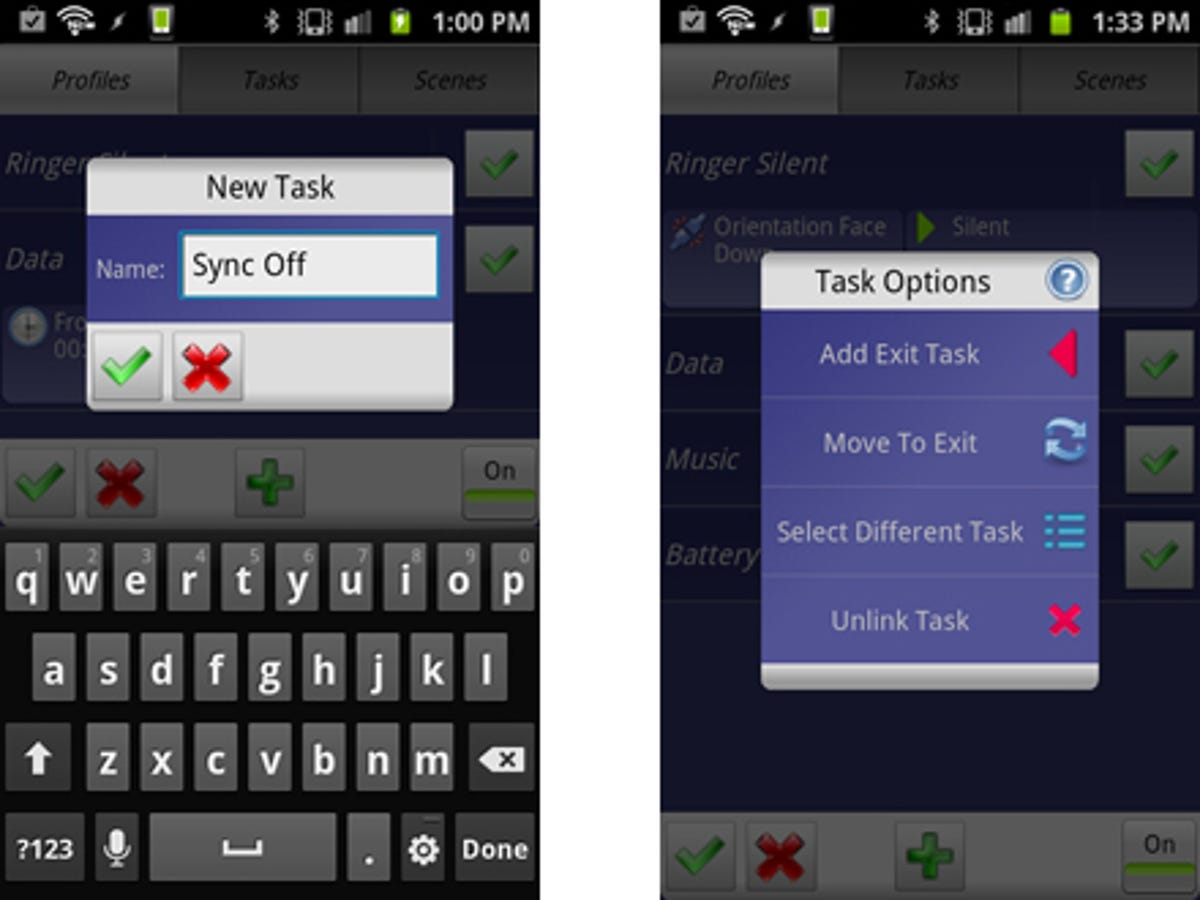
To make sure your data sync is switched off during the night, you’ll need to create what is known as an ‘Exit Task’. Simply long-press the ‘Sync’ task in the right-hand column and select ‘Exit Task’ from the pop-up menu. Create a new task called ‘Sync off’, and repeat the process from earlier — only this time, when you’re on the Auto-Sync page, pick ‘Off’ instead of ‘On’.

3. Select the days of the week you’d like to receive emails
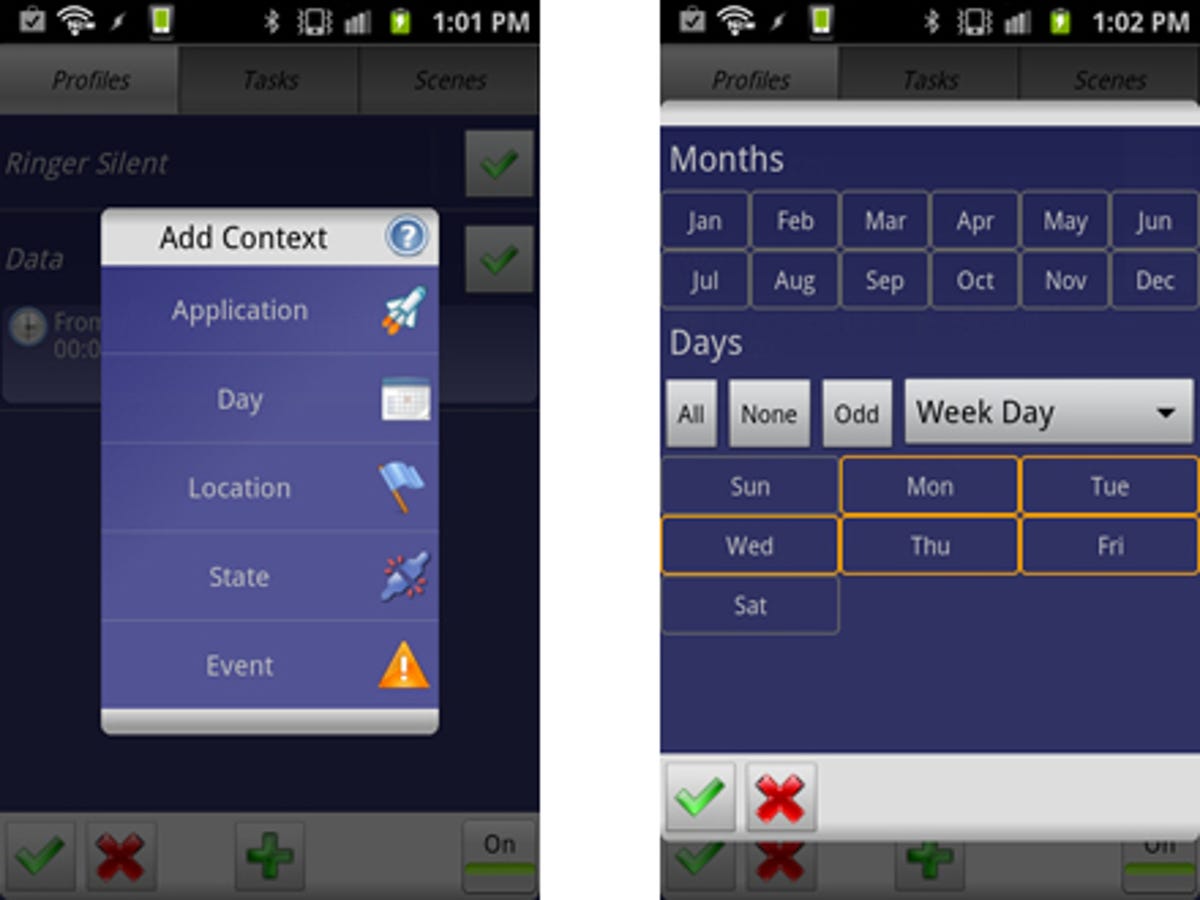
This step is directly related to the previous one. Auto-Sync controls when your emails come through to your handset, and if your emails are related to work, you won’t want them at the weekend — that’s your own time, after all.
In the profile menu, tap the left-hand column (where it shows the content information), and you can add an additional layer of context. In this case, we’re going to tell Tasker which days we’d like the Auto-Sync to be active. In the context menu, tap ‘Day’ and on the next screen select ‘Week Day’. You can then choose the days of the week you’d like to receive emails.

4. Enable your phone’s data in a specific location
Now we’re into really deep Tasker functionality. We’ve already added time and day contexts to the Auto-Sync profile, but you can also specify a location. Say for the sake of argument that you only want your phone to sync data when you’re at work — on days you’re not in the office (due to holidays, illness or badly planned hiking trips) — you’ll want to be cut off from the digital world. Tap the left-hand content column and add another context — Location.
You’ll be presented with a menu that links into the Google Maps app. From here, you can choose the location (either by picking your current position or manually finding it on the map), and the distance from target. Having a large radius is especially important, as to conserve battery life, you may want to pinpoint your position using your network signal, rather than the power-hungry (but more accurate) GPS. Picking a value of around 50-100 metres is usually acceptable — the margin for error is forgiving.
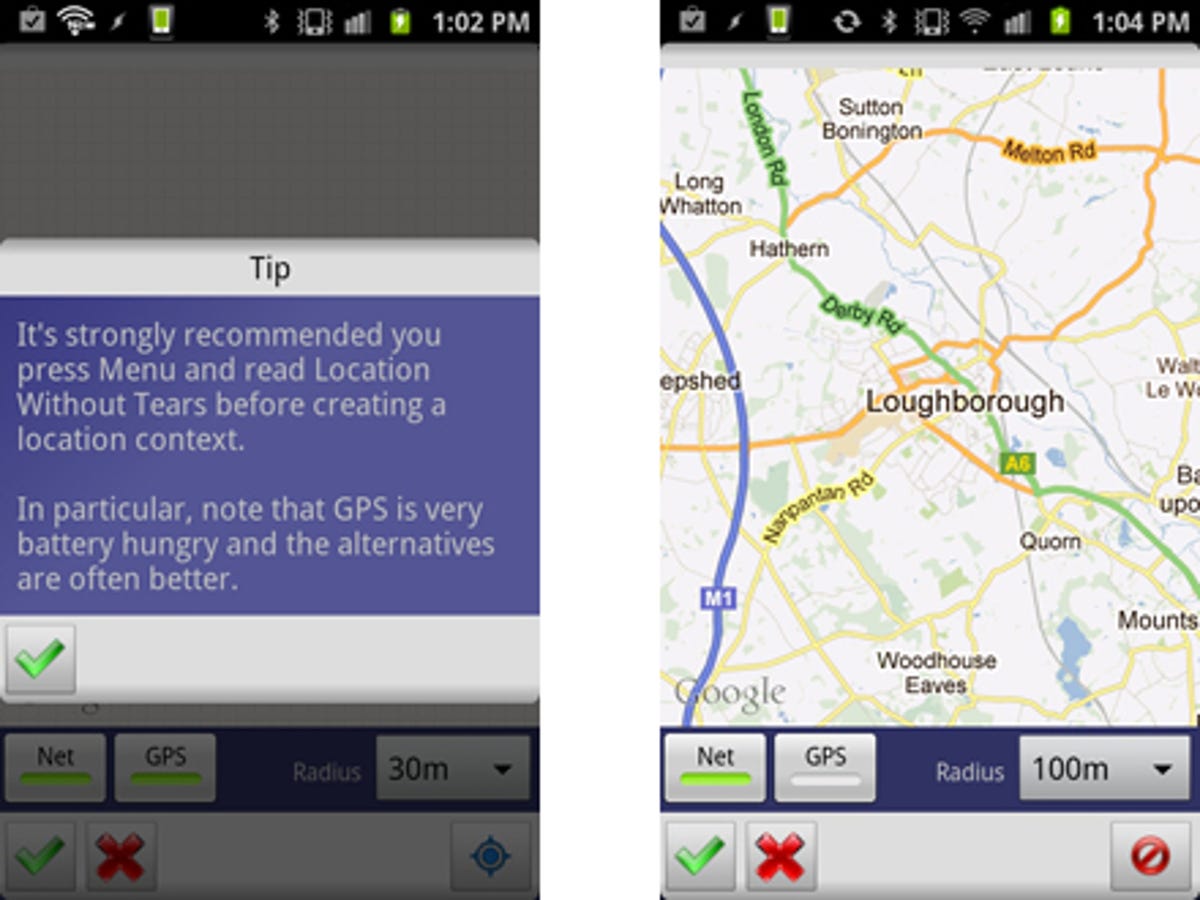

Tasker will know in future that Auto-Sync is only to be enabled if you’re within that 100-metre sweet spot at a certain time of day on a certain day of the week. Smart, huh?
5. Launch any app when you plug in your headphones
The previous steps in this guide may have made your head spin a little, so here’s a more straightforward process. We’re going to create a profile that will automatically launch Google Music whenever a pair of headphones is plugged in.
On the profile creation screen, select ‘State’, then ‘Hardware’ and finally ‘Headset plugged’. You can also specify if the headphones have a mic or not (to avoid the Google Music app from launching when you plug in your hands-free in-car kit).


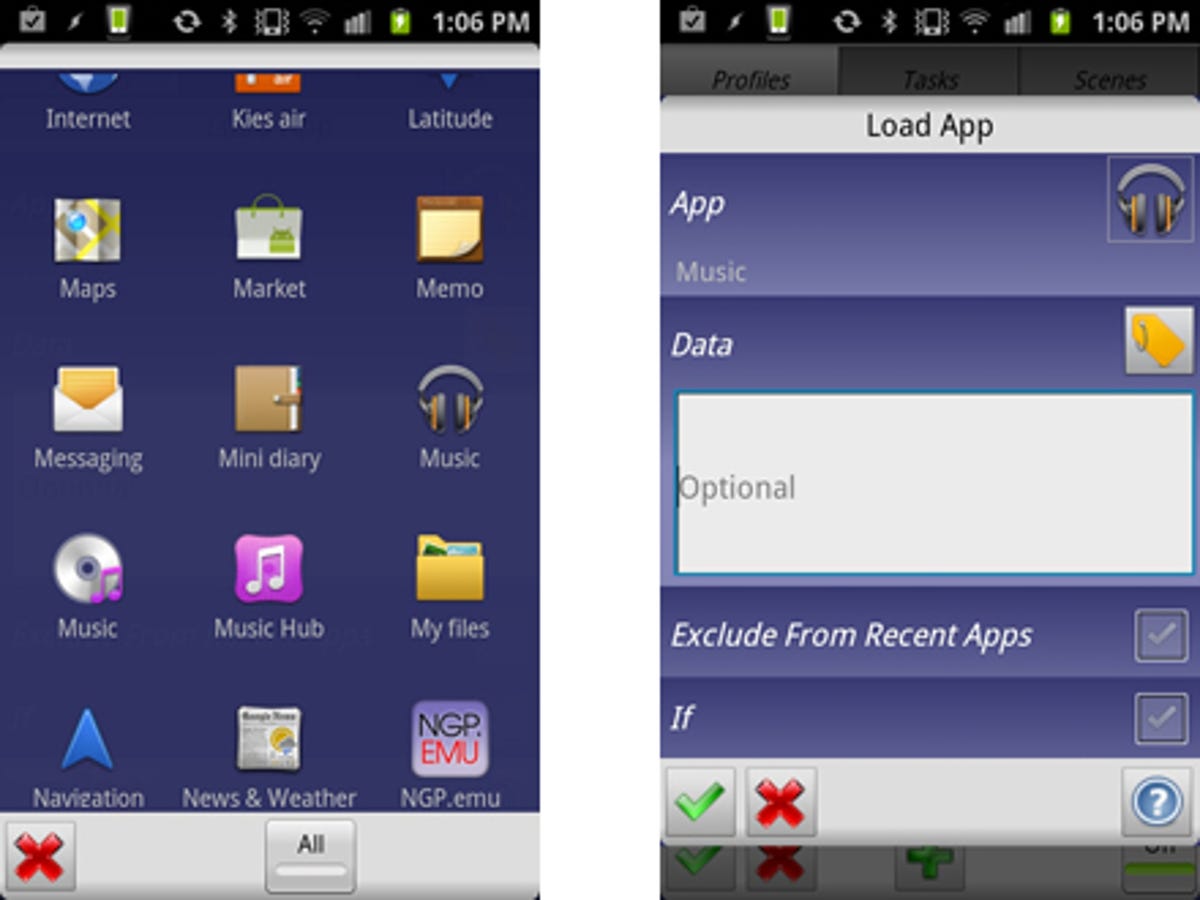
Next, you’ll need to tell Tasker which application you’d like to open when the headphones are inserted. Pick ‘Load App’ and you’ll be shown a list of every single application currently on your phone.
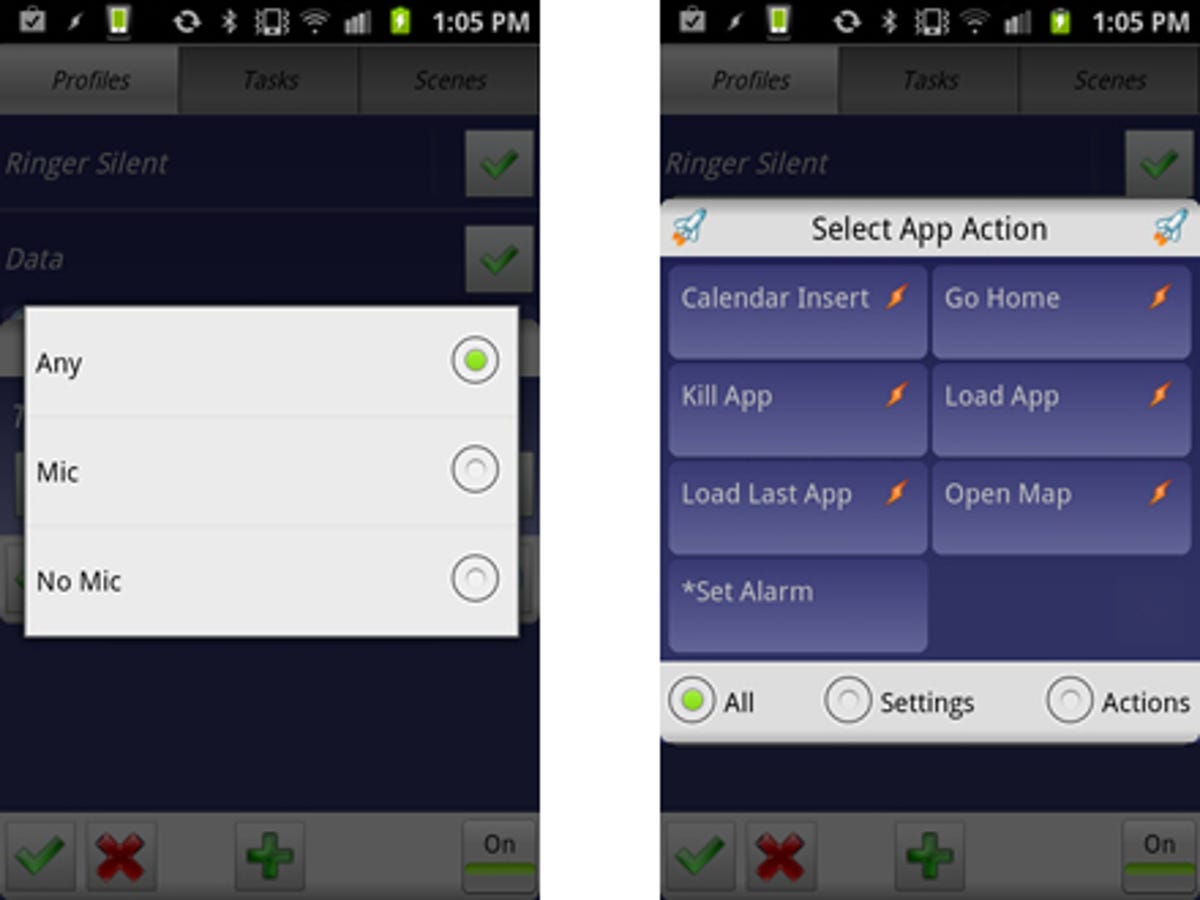

Find Google Music (or your applicable media player). On the following screen, click the accept button at the bottom. If you have more than one media player on your phone and would like to be offered a selection, pick more than one app. When you plug in your headphones, a pop-up menu will appear and you can pick your desired choice.

6. Dim your screen when the battery level is low
Tasker is clearly very useful for automating fiddly processes on your handset, but it can also be used to conserve precious battery power. In this step, we’re going to create a profile that automatically drops your screen brightness down when the battery juice dips below a certain point.
Create a profile and name it whatever you wish — you’ve got the hang of that by now, right? Select ‘State’, ‘Power’ and then ‘Battery level’. The following screen has two sliders — the first represents the lowest power level (so set it to zero), and the second is the highest. Set that at around 15-20 per cent and click accept.
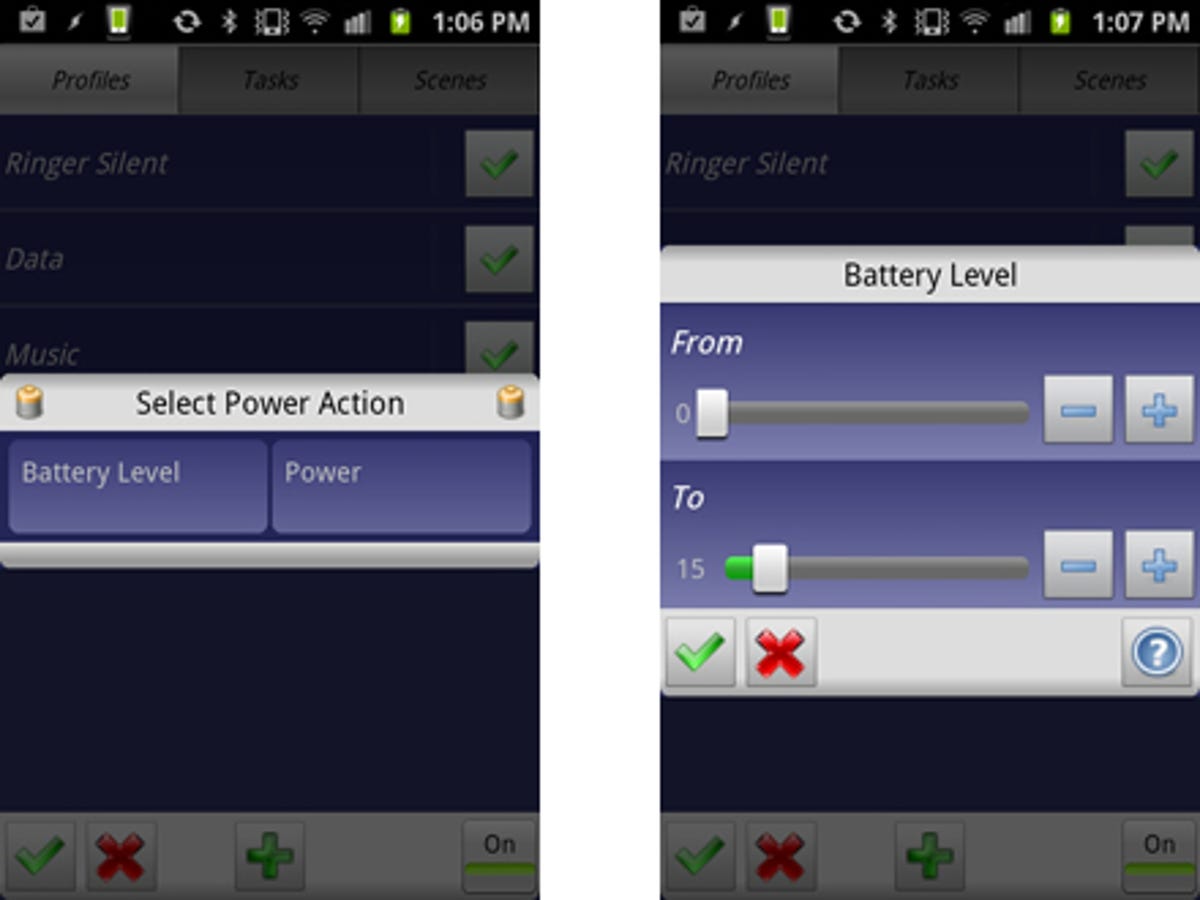

Name the task ‘Dim Screen’ or something similar, and then select ‘Display’ and ‘Display Brightness’.
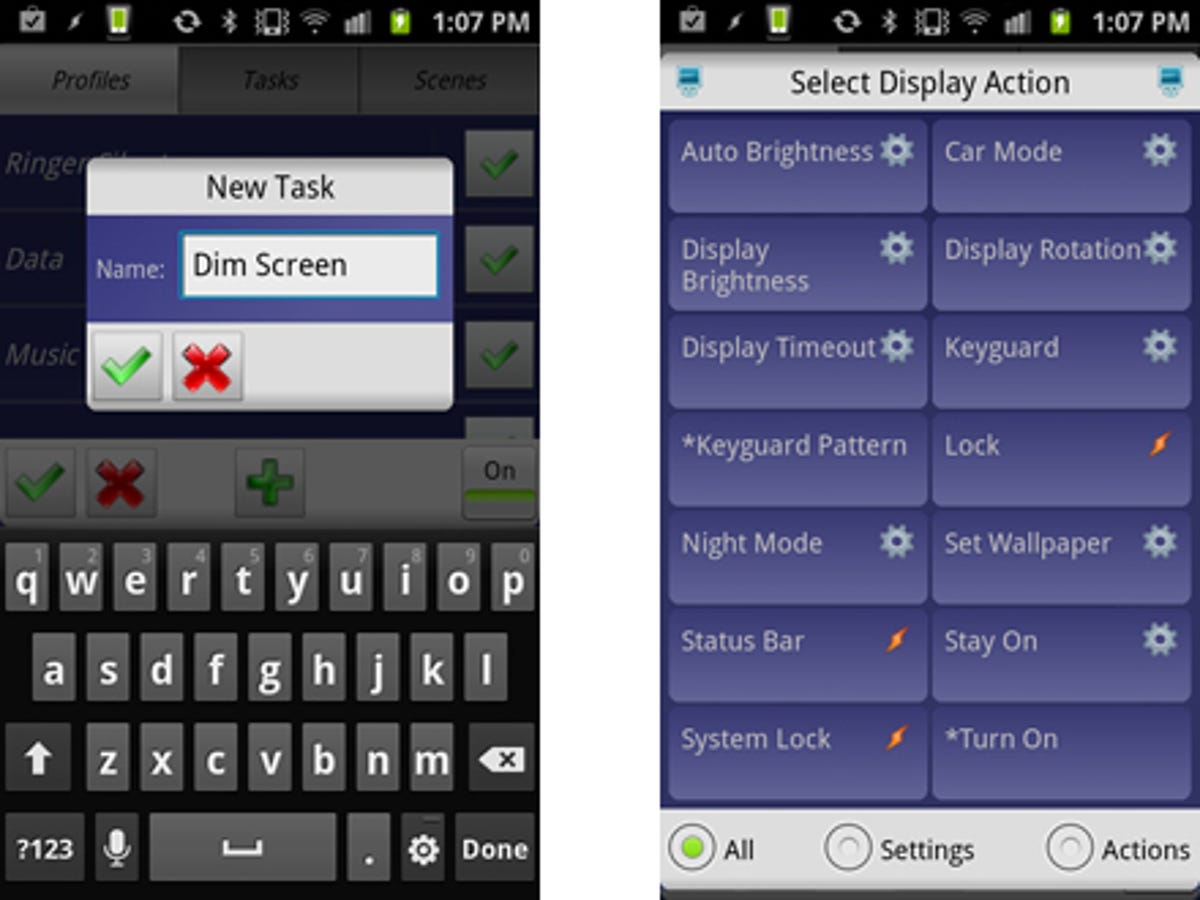

Dropping the value down to around 10-20 per cent will make the screen very dark, but still legible. It will save you a surprising amount of battery power. If you have auto-brightness enabled, you’ll need to turn it off — Tasker will remind you of this fact at the end of the process.
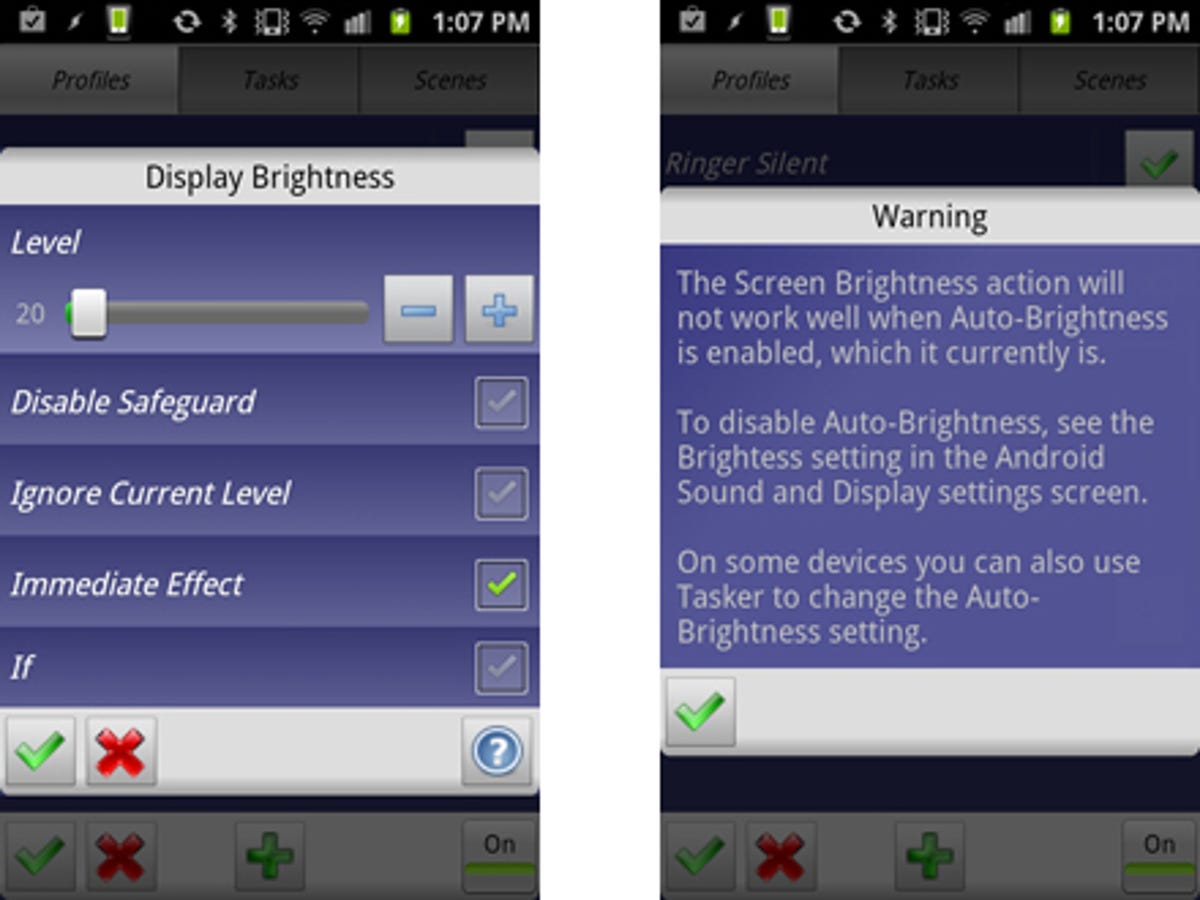

As with the Auto-Sync profile, you’ll need to create an exit task to tell Tasker to pump the screen brightness back up to your preferred level when the battery is topped up.
This profile could potentially offer up many minutes of additional power. It’s something of a godsend when you’re away from home and don’t want your S2 dying on you. For additional juice, you can add in additional tasks to the low battery level context, such as switching off mobile data.
7. Experiment and go wild
As I said before, this guide scratches the surface of what Tasker is capable of. It also works alongside third-party applications, so you can automate all kinds of processes. It’s possible to export profiles and share them with others, or download the profiles of other users to save yourself the bother of actually programming the steps yourself.
Tasker is such a fantastically powerful application that you’ll genuinely wonder how you ever coped without it.


