Getting tired of your old MacBook? Maybe you’re looking to upgrade to a MacBook Pro 14 or 16, or maybe you’re hopping into the desktop realm by preordering the newly announced Mac Studio. You could even have your eye on the rumored M2 MacBook Pro that might arrive later this year.
But before you buy a new MacBook, you may be able to get some money by selling your old Mac to help defray the cost of a new one. However, you’ll need to migrate your data to the new Mac and wipe that old one clean first.
Read more: Best MacBook for 2022
Whether you are giving your Mac to a friend or family member, recycling or donating it to an organization, you’ll want to erase your personal information and files before parting with it.
It’s a crucial security measure you don’t want to skip. Your Mac’s hard drive is bursting with sensitive information that you wouldn’t want to be accessible, even if you trust your laptop’s next owner. There’s always a chance that some malware could snake its way in and uncover your personal details.
Here’s how to remove all traces of your data and return your old Mac to its default factory settings.
1. Sign out of your accounts
After migrating your data to your new Mac or making one last backup to preserve your data, it’s time to remove all traces of yourself from the machine. First, you’ll need to sign out of all of your accounts. Years ago, this was done using iTunes, but you now must individually sign out of three apps — Music, TV and Books. Open up any of those apps and go to Account > Authorizations > Deauthorize This Computer. You’ll need to enter your Apple ID and password and then hit the Deauthorize button.
Next, you’ll need to turn off Find My Mac and sign out of iCloud. Go to System Preferences > Apple ID, click iCloud in the left panel and then uncheck Find My Mac. Next, click Overview from the left panel and then click the Sign Out button.
Lastly, you’ll need to sign out of Messages. Open the Messages app, go to Messages > Preferences, click the iMessage tab and then click Sign Out.
2. Bluetooth unpairing
If you’re handing down your old Mac to your kid or someone else in your house, then it’s a good idea to unpair any Bluetooth devices from it so your mouse or keyboard controls the new Mac and doesn’t interfere with the old one. Go to System Preferences > Bluetooth, mouse over the device you want to unpair, click the X button to the right of its name, then click Remove.
3. Reset NVRAM
NVRAM is memory to which your Mac saves settings that it needs before loading MacOS: things like screen resolution, time zone, volume level and startup-disk selection. Sometimes these files can get corrupted, so give your Mac’s next owner a fresh start by resetting the NVRAM. To do so, shut down your Mac, then turn it on and immediately press and hold four keys together: Option, Command, P, and R. You can release the keys after 20 seconds or so. That’s it! Your Mac’s NVRAM has been reset.
4. Factory reset
You need to put your MacBook ($445 at Amazon) into Recovery Mode in order to erase all of your data and reinstall MacOS. To enter Recovery Mode on an Intel-based Mac, restart it and immediately press and hold Command-R. You can release the keys once you see the Apple logo.
(If you are already setting an M1-based Mac, then booting into Recovery Mode is slightly different. You simply press and hold the power button until you see the startup options window, then click Options and Continue to get to the utilities window.)


Apple
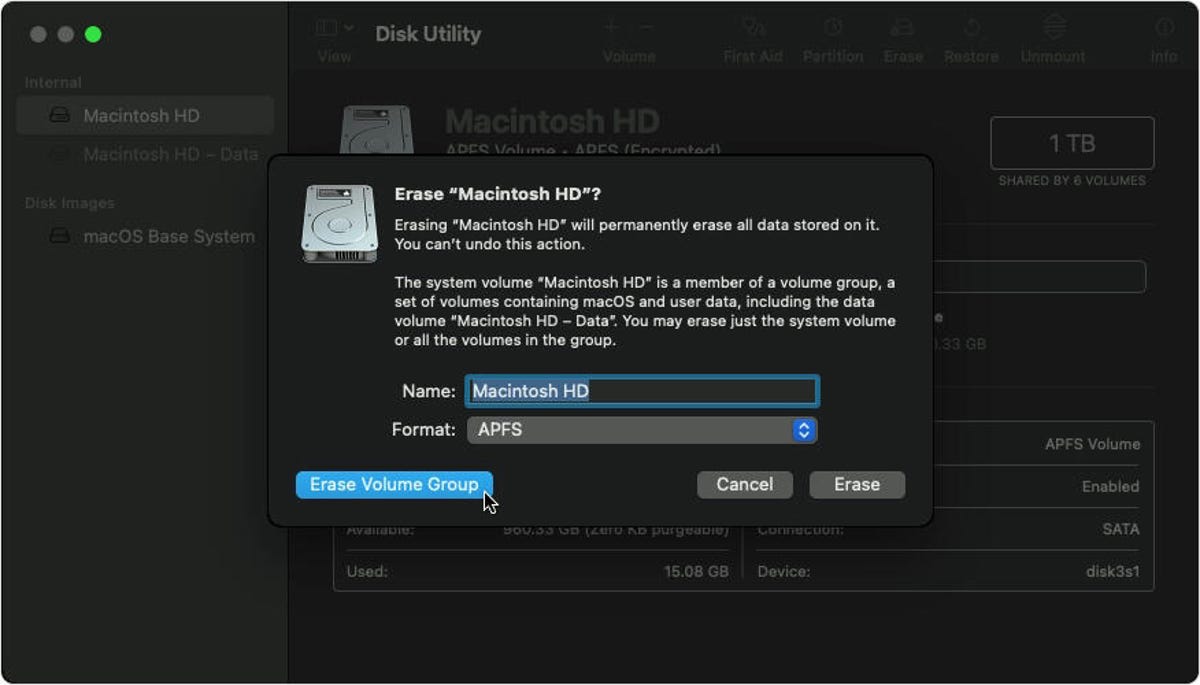
Next, you’ll see the MacOS Utilities window. Choose Disk Utility, click Continue and select your startup disk — unless you renamed it, odds are it’s labeled Macintosh HD or something similar. Next, click the Erase button at the top of the Disk Utility window and fill out these two fields:
- Name: Choose a name for the fresh, new volume. Why not go with the tried-and-true Macintosh HD?
- Format: Choose APFS.
If you are trying to sell an ancient Mac that has a mechanical hard drive instead of a solid-state drive, then choose Mac OS Extended (Journaled) for Format.
Next, click the Erase Volume Group and after Disk Utility does its thing, quit Disk Utility. (If you don’t see the Erase Volume Group button in the lower-left corner, then click the Erase button in the lower-right corner instead.)
You should return to the MacOS Utilities window. (If not, restart your Mac again, holding down Command-R while it reboots.) From the MacOS Utilities window, select Reinstall MacOS and follow the instructions to install the operating system. After MacOS has been reinstalled, you’ll be greeted by the Setup Assistant, which you can then quit out of and shut down your Mac. It’s now ready for a fresh start with its next owner.
Here’s how to factory reset an iPhone, how to reset AirPods that are acting up, and how to reset a Chromebook in under a minute. Plus, check out every device Apple announced at its latest event.


